In the past few years it has been increasingly easy to source professional quality prototype PCBs from Chinese manufacturers at very attractive prices. A downside of this is long delivery times. However there is still a place for DIY PCBs when you want to build a quick prototype and the design is not too complex. Designs can be printed onto transparent film and a PCB can then be manufactured using photo-senstive copper-clad board, assuming you have a UV light box. I recently found out about an alternative way of making PCBs that does not require the UV light box or photo-sensitive PCB material. The PCB image is printed on special paper using an ordinary laser printer. Then, using a domestic iron, the image is transferred to copper-clad board. The PCB can then be etched in the normal way, with the ironed-on toner creating an etch-resist. I have recently made of couple of PCBs using this method and am quite pleased with the results.
Method (single-sided PCB)
- Design the PCB using your favourite ECAD package. When making homemade PCBs it is a good idea to avoid thin tracks (traces) or very small clearances.
- Print the design onto toner transfer paper (glossy side) using a laser printer. Set the printer options for highest quality, maximum density.
- Clean the copper clad PCB material thoroughly. I used water, some mild detergent and some very fine wire wool. This step is very important. If the copper clad board is not scrupulously clean (and dry), the toner will not stick to the copper.
- Using a hot iron, transfer the image onto the copper clad board. It may need a couple of minutes of ironing, applying steady pressure and ensuring that the paper does not slip. You may need to experiment with different temperatures and timing in order to achieve the best results.
- Using a black permanent marker pen, e.g. Sharpie, fill-in any gaps where the toner has not stuck to the copper.
- Etch the PCB using Ferric Chloride or equivalent*. I used sodium persulfate. Use a plastic container for it, e.g. an ice cream tub.
- Thoroughly rinse and dry the etched PCB. Remove all of the etch resist. I used acetone* for this, which I bought from a pound shop (sold as nail varnish remover).
- Drill the holes for component leads (omit this step for surface-mount boards).
*
Warning Take the utmost care when using PCB chemicals. Carefully read the safety information and take note of safety precautions. It is recommended that you wear safety glasses, rubber gloves and overalls when using etchants.
Dispose of the ‘spent’ etchant responsibly, in accordance with local authority regulations. I put mine in a clearly labelled plastic bottle and took it to the local recycling centre.
 |
| PCB design printed on toner transfer paper |
 |
| Copper-clad board with ironed-on etch resist |
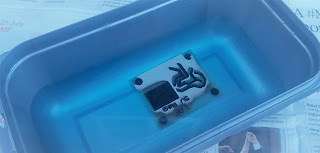 |
| The etching process |
 |
| The finished PCBs after assembly |
Disclaimer: This is my personal blog. Views expressed in my posts are my own and not of my employer. The information provided comes with no warranty. I cannot be held responsible for the content of external websites. Any practical work you undertake is done at your own risk. Please make health and safety your number one priority.


Ive used that method myself and got good results i was toying with the idea of getting an old laser printer and altering the fuser temp /voltage so as to limit the first toner melt onto the paper and wondering if that would help with the re-melt with the iron onto the copper dont have the space at the moment to try it out though might not work as temp regulation would be hard as many fusers just have a lamp inside that heats up the roller rather crude but it works with a temp sensor bolted on with better control it may improve the transfer
ReplyDeleteMaybe. I guess there would be some compromise in the adjustments to ensure that the toner gets transferred cleanly to the special paper.
ReplyDelete